OP-Z EXOTIC Connectivity Tricks

Thanks for the help @FunkyJunky, it’s much appreciated.
Still problems though I’m afraid.

I needed to install the DynamicControlsLE as I didn’t have that option in the dashboard. So that’s installed and I do the following -

Start Roli Dashboard and connect my blocks.
Click DynamicControlsLE and click Edit
I then get into the screen like yours above.
I have copied the mode files into the folder and they show up on the left.
I then select the left block, it hangs for a few seconds and I click ‘left side mixer’ and again it hangs for a few seconds.
I then repeat the process for the right block.
And then I close Roli Dashboard and disconnect the blocks.
But it doesn’t seem to be loading onto the blocks. The layout on the blocks is not like in your video and they both have a multi coloured 5x5 grid, each column a different colour. And it seems to be the same 5x5 grid layout whatever .mode file I choose.
Is there something else I need to click to force it to update the blocks at all?

I have the midi part covered, I think, as I have installed midiflow and can open your midi file in midiflow but haven’t got that far yet.

Cheers

1 Like

hey hughsieman !
you have imported preset files into the ROLI file directory and you can see them in the ROLI dashboard. so that part is good. usually when BLOCK is selected and than select the preset from the list, than it shows on the BLOCK in few seconds. no need to disconnect. its probably some kind of compatibility issue. i use first revision* of ROLI BLOCKS. or maybe they have updated littlefoot in some way. i want to debug the compatibility issue further, but right now i dont have my ROLI BLOCKs with me. this weekend i will be back in my jamm-lab and will be able to use them. sorry for the trouble.


Lightpad Block 1st revision*
Lightpad Block M is 2nd revision*

So brilliant!

1 Like

Hi @FunkyJunky, thanks again for the help and please don’t apologise :wink:

As a developer myself I wanted to give you as much info as possible as I know how annoying it can be when someone says ‘it just doesn’t work mate!’ so I have started from scratch on a different Windows 10 machine.

I have installed the latest Roli Connect (and eventually managed to get the Roli Hardware Driver running).
Installed the latest Roli Dashboard.
Redownloaded your .mode files and put them into the correct location.
I have then started Roli Dashboard, connected a block, selected ‘Dynamic Controls LE’, clicked Edit, and then selected ‘left side mixer’ and it’s the same issue.
My blocks are the newer ‘M’ version.

Thanks again.

1 Like

Sorry @FunkyJunky, I forgot to mention that my blocks are on the latest firmware and I can successfully change littlefoot script in the Apps section and the blocks update with the new layout fine.

Cheers

1 Like

Great ideal here! But how did you figure out to send all those letters and numbers to enter that weird state?

1 Like

I have to say this is the coolest OP-Z thread out there, excellent hacking @FunkyJunky :gear: Super good ideas and you have a flexible mind. Respect!

3 Likes

hey @hughsieman! im still not sure wat might be the problem.
i have completely uninstalled everything ROLI related from my computer.
and than reinstalled it back on. latest version and up to date.

first i thought that they have updated something, but no,
after reinstalling everything back it still works smoothly.
try to reinstall from littlefoot from here.
if it still doesn’t work than i really don’t know. i appreciate your feedback though, i didnt expect this problem.

miRack pneumatic/sound perimeter modulation

its possible to use your phone mic input as a midi controller for cc perimeters, use as a blow pressure controller for your instruments. it can also be used with videopacks, you can make sound visualizers. its works by converting sound into gate. it can control any MiDi perimeter on OP-Z !

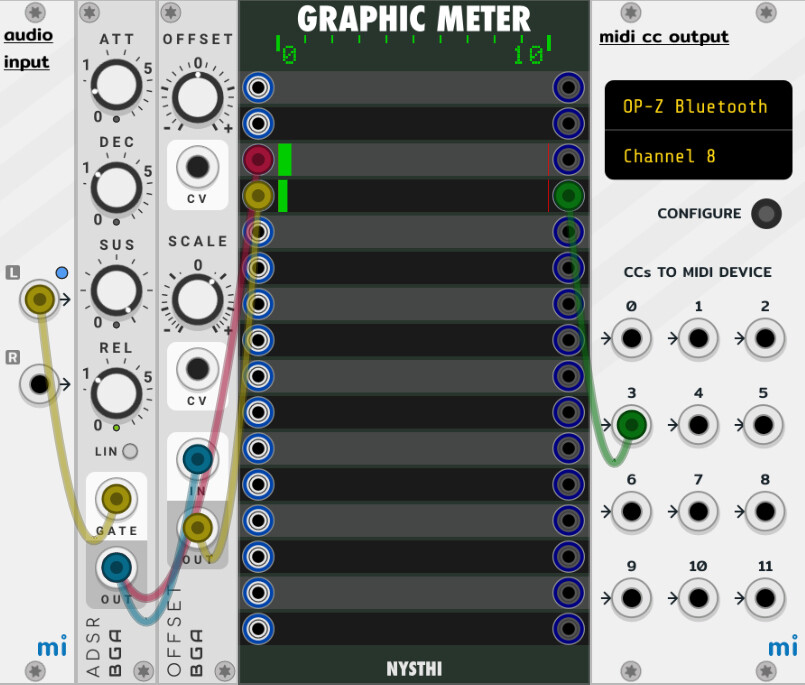
get this preset here. or you can just copy it from the picture above.


i made this simple 3color LED visualizer for OP-Z CV outputs.
connector fuses two outputs into one. and is all bade in clear resin.
i made a custom LFO for it in miRack. so if key is pressed blue light has its trigger envelope and note value is LFO rate of red light.

get preset here

i want to share this app with you. because its impossible to live with out it.
literally almost evrything is possible with it. if you have any MiDi gear than you can get crazy functionality out of it.
you can control a lot of things simply with your keyboard or anything else you might have

all presets are here:
harmonic# scale
pentatonic scale
play stop - mod wheel
pattern change - pitch band
mute group select - mod-wheel
you can use those presets more like an inspiration templet and change things in it how ever you like.
@onthervn im sending syntax with MiDiFlow. (if C4 is pressed syntax … is sent)
@nok @xmacex thats for kind words. i apreciate it a lot :hugs:

2 Likes

Hi @FunkyJunky

Thanks very much for the detailed response, I really appreciate it. It looks exactly the same for me until the very last bit when the block doesn’t seem to update.

Anyway, it’s not all bad as this has made me change direction slightly and it’s probably a good thing. If I had got this running then that would have been great, I would have used it loads but not really learnt anything.

Instead, I decided to modify the littlefoot code I already had with a view to adding in some functionality and making it operate more like yours.

The first thing I have done is change it from 4 channels per block to 5. This is so that I can add the new module track and also have another channel to control the master volume.

The current code passes values into the sendMIDI function like this to adjust the levels -

Track 1 is sendMIDI(176, 16, level)
Track 2 is sendMIDI(177, 16, level)
Track 3 is sendMIDI(178, 16, level)
…and so on.

I have added support for the module track fine with value 189 and it works great -
Track 9 is sendMIDI(189, 16, level)

I can’t get the Master Volume changing though. What values are you using to control the Master Volume as I can’t find it anywhere?

I’ve got the bug a bit with this now and fancy adding someone stuff like pattern changes etc.

I think this will work best for me as sometimes I don’t use a phone/tablet and this still works with a short usb cable directly between the Z and blocks.

I’ll be happy to share the file when it’s done of course if anyone is interested.

Cheers again for the help mate.

1 Like

this is awesome, im glad you are making your own set ups :1st_place_medal:
im not sure what numbers “178, 177, 176” refere to.
but i use this numbers for modulating master volume.
i would make an dynamic control element that has this perimeters:


there is no cc for master volume, so im utilizing master filter, that has same effect as volume.
… master filter modulation range must go from 0-64 not from 0-127 other wise it will over modulate filter perimeter. you can adjust cc output range in MiDiFlow app.

it only possible in wireless set up (Bluetooth midi to MiDiFire app on your phone) if you are using wired set up, you are limited to 0-127cc range.

…list of ALL roli dashboard apps:

…awesome to explore with OP-Z.

1 Like

Cheers @FunkyJunky

I’m controlling the master filter now as well :grinning:. I’m halving and rounding the level and it’s working great.

Getting into this, changing stuff on the Z, monitoring the MIDI traffic, and then making changes to the littlefoot code accordingly. Will add support for pattern changes next, I reckon.

Thanks again for the help

1 Like

Hi @FunkyJunky, quick question please regarding your lightpad controllers.

How are you changing pattern without changing project each time?

Every pattern on every project appears to have it’s own code so when you send the pattern change it needs the code for the new pattern specific to the current project. I have tried changing ‘Alt Program Change’ in MIDI setup but it doesn’t seem to make a difference.

Cheers

you make a note grid on the ROLI, than you relate note value to cc value,
so first note is cc00 and very last note is cc127 . cc address number must be cc103
but first we have to change the note range, because your controller doesn’t start with C-2. so that it fits your controller. than you have to limit cc range , cc127 is way to high, it needs to go up to cc15.
than this whole preset must be sent to the channel number that is the same as your project number… so if you are working on 3rd project, send this remapping to channel3.
i made a diagram below, hope it clarifies this method:

i want to clarify midi terminology. in midi perimeters have names cc0 to cc127 that tell witch knobs/perimeter is modulated and values cc00 to cc127 that tell how much is modulated. in this project we use perimeter 103 and modulate it from cc0 to cc15.

Thanks very much @FunkyJunky, I really appreciate the detailed response and image. I think it makes sense to me now. I’ve been a professional software developer for over 25 years but never done any MIDI stuff so it’s a learning experience and all good :wink:

It’s what I expected to be honest, you can’t simply send a value 0-15 to change pattern and stay in the current project, each pattern has it’s own value, relative to the project it is in. So, I’ve sorted this by adding the project select at the same time as pattern select. That way the block knows the current project when the pattern change request is made and can calculate the correct value for the project/pattern.

I’ve also added mute group change as well so it’s coming along nicely :grinning:

Cheers

1 Like

simple bluetooth button upgrade
i often use bluetooth midi connection. the original bluetooth button on the back is kinda mushy, and after long use i had to press it really hard to activate it :confounded:
…so i have devised a simple solution for it.
just took a simple apart,


than i have removed the clicky membrane
and stick it on the back of the original button.

its so much better than before. bluetooth button click now like a regular button., and i can feel the click👍

2 Likes

I just had to jump in to say this thread is just so cool. You have really come up with some creative things with your Z, funky. Really makes me look at the unit in a new way. Keep up the awesome work!!

5 Likes

OP-Z old NFC ticket trick

6 Likes